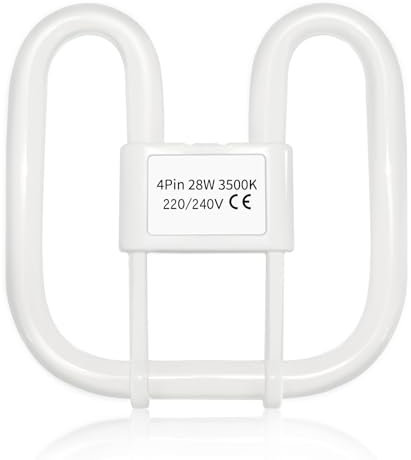
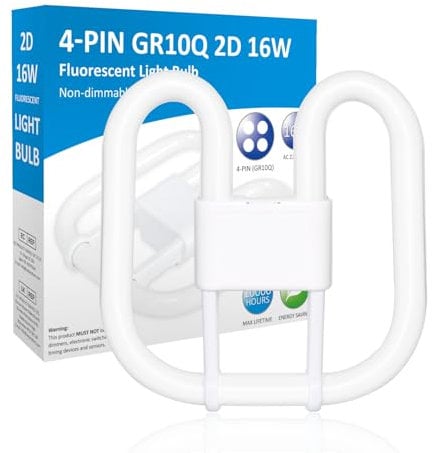
GR10q 4 Pin 28W 3500K Warm White, 2000LM, Very Large Size, DD Square CFL Compact Fluorescent 4 Pins Light Bulb, AC 220V, 4 Pin Flat Butterfly Bulb for Flush Ceiling Light, 1 PACK (Ballast should >28W)
Show on Amazon
Show on Amazon
Colour: 4pin 28w 3500k 20x20cm


Offer

£ 9.99
£ 4.49 | 1-2 Days
go to shop
Price trend
Product description
- Precautions before Purchase 1, 4 PIN Light Bulb, cannot replace 2 PIN light bulb 2, 28W, 2000LM, the bulb size is LxW 20x20cm, TOO LARGE to replace 16W(smaller size) light bulb. 3, Compact Fluorescent Light Bulb, NOT LED Bulb; 4, MUST use with Ballast (must be applicable to 28W). Can t light up without ballast.
- 28W Light Bulb If you are using a 16W 4PIN bulb and you want to replace it. Please note this 28W 4PIN bulb is not suitable for you as their sizes are different and cannot be replaced for use!
- 28w GR10q 4-pin CFL compact fluorescent light bulb, AC 220-240V. Soft warm white 3500k with brightness 2000 lumens, no flicker, high color rendering 80Ra.
- Ballast Needed This is a CFL light bulb, NOT applicable to LED lighting systems. Please pay high attention on the minimum loading of ballast. It must be used with ballast with a power greater than 28W. Otherwise, the light bulb will flicker and the bulb will not work properly! Not applicable to 16W or 22W ballasts.
- 4 Pin Light Bulb 4 PIN light fitting type, NOT 2 PIN light fitting type! If your original bulb is 2pin and you want to replace it, sorry but this 4 pin light bulb is NOT compatible, it can t replace 2pin light bulb!
- DD flat butterfly bulb shape, fitted with a GR10q 4-pin square push fit base, easy to install. Energy rating of G, 8,000hrs max lifetime, does the job intended. This CFL Light bulb is not dimmable.
- Energy efficient CFL 4 pin light bulb 28W, good replacement for a bathroom ceiling light. Ideal for flush ceiling light for bathroom, kitchen, footpath area, corridor, stairwells, etc.
- **HOW TO INSTALL THE 4PIN LIGHT BULB 1, Please check if the ballast(4 PINS), and ceiling light frame size( 20x20cm) are compatible. 2, Place the ballast into the corresponding position of the light bulb (pins to pins). 3, Place the whole unit (ballast+light bulb) onto the ceiling light frame. 4, Connect the wires and then connect the power supply, turn on and it lights up! **Please always remember to cut off the power before installing replacing light bulbs.**
You might also be interested in these GR10q bulb.

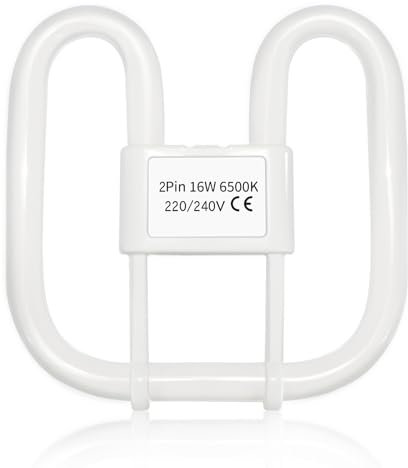
Akynite GR10q 4-Pin Bulb 16W 3500K Warm White, 950LM, Small 13.3x13.3cm, 4 Pin CFL Compact Fluorescent Light Bulb, AC 230V, not dimmable, GR10q DD Flat Butterfly Bulb for Flush Ceiling Light, 1PC
Precautions before Purchase 1, 4 PIN Light Bulb, not compatible with 2 PIN light fixture ballast. 2, 16W, 950LM, the bulb size is small 13.3x13.3cm, TOO SMALL and not compatible to replace 28W or 38W light bulb. 3, Compact Fluorescent Light Bulb, NOT LED Bulb, MUST use with Ballast. Can t light up without ballast.
Check price
![Osram 28w 2D Square 4-Pin Gr10q Cap Standard White (3500k) Compact Fluorescent Lamp [Energy Class G]](https://cdn.which.one/productimages/U/G/M/B00146BMGU.jpg)
Osram 28w 2D Square 4-Pin Gr10q Cap Standard White (3500k) Compact Fluorescent Lamp [Energy Class G]
Low profile for slimline wall or ceiling fittings.
free shipping
Check price

Bynome 4Pin Light Bulb 2D Gr10q 4 pin 16w Cap Standard White (6500k) Bathroom Ceiling Light Bulb Compact Fluorescent Lamp,Energy Saving Lamp
835 - Standard White Colour
Check price

Set Of 2 Fluorescent Light Bulb - 4 Pin Energy Saving 16w Slim Lamp Tube 2d | Long Life Lamp Durable | High Efficiency - Compact Pack Of 2 | 4-Pin White (10,000 Hours) GR10Q 3500k 16 Watt Bulbs
MULTI-USE - Ideal for use in domestic and commercial applications, the slim flat profile makes the lamp suitable for use in utility lighting situations.
Check price

GR10q 4-Pin Bulb 28W 3500K Warm White, 2D Square CFL Compact Fluorescent 4 Pin Light Bulb, GR10q DD Flat Butterfly Bulb for Flush Ceiling Light, 4 pin Bathroom Light Bulbs, 1 Pack-19.0 * 19.5CM
( )- Notice This product is GR10q 4-pin 2D compact fluorescent light bulb 28w, please check whether it is suitable for use.
Check price

GR10Q 4-PIN 28W Compact Fluorescent Lamp Neutral White 4000K, 230V(Large Size 20 * 20cm), Recessed Ceiling Light, CFL Light Bulb, Low Energy Light Bulb, Suitable for Indoor Stair Corridors, Halls
28W GR10q 4-PIN compact fluorescent lamp with butterfly shape appearance,the size is 20cm long and 20cm wide, not a small size (13.3cm*13.3cm), please pay attention to whether it is suitable for your lamp
Check price
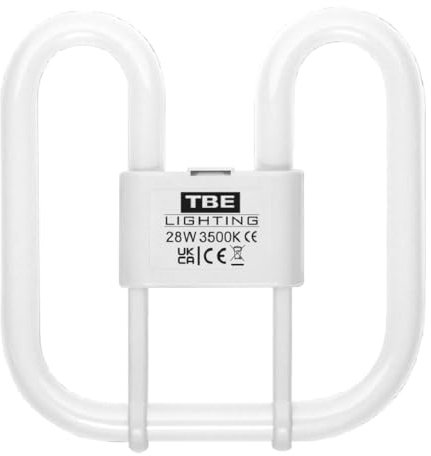
TBE LIGHTING 28w 2D 4-PIN CFL Energy Saving Lamps - DD Fluorescent Bulbs - 4-Pin GR10q Base Fittings - Long Life Lamp, Soft White 3500K (Single Unit)
TBE Lighting 28W 4-Pin CFL DD Lamps (GR10q Base) Reliable compact fluorescent butterfly bulbs with 4-pin GR10q base. PLEASE DOUBLE-CHECK fitting type before purchase to ensure compatibility with your existing bulkhead, ceiling, or moon light fittings.
Check price
![SJ essentials 16W 2D 4-Pin Energy Saving Light Bulb, Cool White GR10Q for Home & Office Use [Energy Class A/G]](https://cdn.which.one/productimages/P/B/L/B0DVZNDLBP.jpg)
SJ essentials 16W 2D 4-Pin Energy Saving Light Bulb, Cool White GR10Q for Home & Office Use [Energy Class A/G]
Energy Efficient 16W power consumption ensures bright illumination while reducing energy usage.
Check price

GR10Q 4-PIN 16W(Size: 13.3cm*13.3cm) Compact Fluorescent Lamp Non-Dimmable Warm White 3500K, 16W 4PIN Recessed Ceiling Light, CFL Light Bulb, Low Energy Light Bulb, Suitable for Indoor Corrido
GR10q 4-PIN compact fluorescent lamp with butterfly shape appearance,Please note that this bulb is a 16W small size 13.3cm*13.3cm, not a large size 20cm*20cm 28W bulb. Please check the size of your lamp to see if it is suitable for your lamp. Thank you
Check price
GR10q 4 Pin 16W 3500K Warm White Compact Fluorescent Bulb, CFL Save Square 4 Pin Lamp Bathroom Light Bulb, GR10q DD Flat Butterfly Bulb for Flush Ceiling Light, Home, AC 230V(Small Size:13.3cm*13.3cm)
( ) Notes before purchase 1. 4-pin bulbs are not compatible with 2-pin fixtures or ballasts. 2. 16W, 950 lumens, bulb size is 13.3x13.3 cm, which is too small to fit in a larger 28W fixture ballast. 3. Compact fluorescent bulbs, not LED bulbs, must be used with a ballast. Will not light up without a ballast (This bulb uses a 4-pin GR10q connector, not a 2-pin GR8 connector! Please check the ballast before purchase, if the ballast only has 2 pins, this 4-pin GR10q bulb is not compatible and cannot be installed in a 2-pin ballast)
Only:
57hrs
54min
41sec
Check price

Bell 16w 2D Square 4-Pin GR10q Cap Standard White (3500k) Compact Fluorescent Lamp
Average rated life 10000hrs
free shipping
Check price
![Generic GR10Q 16W 2D 4-Pin Energy Saving Light Bulb Cool White for Home, Offices [Energy Class A]](https://cdn.which.one/productimages/R/8/B/B09LD4SB8R.jpg)
Generic GR10Q 16W 2D 4-Pin Energy Saving Light Bulb Cool White for Home, Offices [Energy Class A]
QUANTITY 1-Item Will Be Supplied In This Pack.
Check price

hautllaif GR10Q 4-PIN 28W Ceiling Light Bulb,Bathroom Light Bulb,Warm White 3500K,Non-Dimmable Fluorescent Tube,Large 20x20cm Size,Ideal for Recessed Indoor Stair Corridors,CFL Spotlight Fixture
Powerful Illumination Emitting a warm white light at 3500K, this 28W GR10q 4 pin light bulbs offers bright and inviting illumination for any room, enhancing the ambiance and creating a cozy atmosphere.
Only:
9hrs
54min
41sec
Check price
![PLUSHA 16W 2D 4-Pin Square Energy Saving Light Bulb Lamp, GR10q Fluorescent Tube, Cool White, Long-Lasting & Efficient [Energy Class A]](https://cdn.which.one/productimages/8/3/Q/B0DZ252Q38.jpg)
PLUSHA 16W 2D 4-Pin Square Energy Saving Light Bulb Lamp, GR10q Fluorescent Tube, Cool White, Long-Lasting & Efficient [Energy Class A]
Energy-Saving Efficiency Reduces power consumption while maintaining high brightness, helping to cut down electricity costs.
Check price
![PixiPals 16W 2D 4-Pin GR10Q Energy Saving Light Bulb Cool White for Home, Offices [Energy Class A]](https://cdn.which.one/productimages/T/W/Z/B0CZCLXZWT.jpg)
PixiPals 16W 2D 4-Pin GR10Q Energy Saving Light Bulb Cool White for Home, Offices [Energy Class A]
QUANTITY 1-Item Will Be Supplied In This Pack.
Check price

Osram 16w 2D Square 4-Pin GR10q Cap Standard White (3500k) Compact Fluorescent Lamp
Suitable for operation on electronic and conventional control gear
free shipping
Check price

Bell 28w 2D Square 4-Pin Gr10q Cap Standard White (3500k) Compact Fluorescent Lamp, 28 W
Average rated life 10000hrs
Check price

LevoLutz 16W 4 Pin 2D Light Bulb, Square GR10Q White 3500K Compact Fluorescent Lamp, Energy Saving CFL, for Bathroom, Home, Offices, Flat Butterfly for Flush Ceiling Light.
CONTAINS 1 x 16w 4 pin light bulb 2D compact fluorescent gr10q - 3500k (standard white) for use in any 4pin socket such as, ceiling, bathroom, wall light, home office and kitchen.
Check price

Wenscha 28w 4 Pin Bathroom Light Bulb 2D GR10Q Cold White 6000K Substitute 25W Bathroom Bulb DD Butterfly 4p Bulbs (Not Dimmable)
ENERGY SAVING -- 80% savings in power consumption compared to CFL or other luminaires
Check price

North Star Brightness 16W 4 Pin Light Bulb, 2D Compact Fluorescent Square GR10Q White 3500K - Energy Saving CFL Light Bulbs for Bathroom, Home, Offices
North Star Brightness
Check price